Adding Yourself To A Waitlisted Course
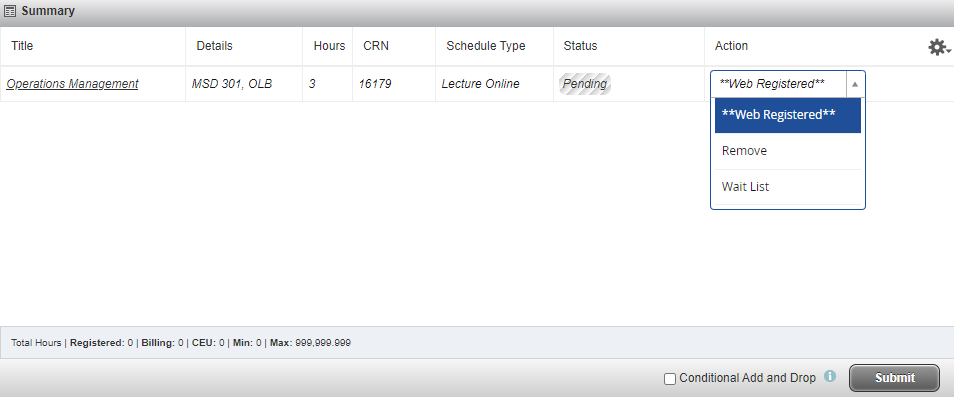
Not all courses have a waitlist option, but if there is one, please choose Waitlist under 'Action' in the "Register for Classes" section of myRider. See the screenshot below. If and when a seat becomes available in the course, you will receive an email to your Rider email account letting you know that you have 24 hours to register yourself for the course. If you do not register within that 24-hour timeframe, your waitlist spot will be forfeited and the next student on the waitlist will be notified that there is an available seat.

Changing From Waitlisted to Registered
If you received an email from [email protected] informing you a seat has been made available, you have 24 hours from the date/time listed in the 'Subject Line' (Header) of that email to register for the course section. The waitlist opportunity expires at the end of the 24 hour period. All waitlist notifications will stop once the Add period ends. Please see the Academic Calendar for the Add period deadline.
- Log into myRider
- Click 'Student Registration'
- Click 'Register for Classes'
- Select the Term for which you are adding the waitlisted class from the drop down box and click 'Continue'. If you are currently registered for another section of the same course or a course with the same meeting times as the waitlisted course, go to Step 5. If not, go directly to Step 6.
- In the 'Summary' box in the bottom right of your screen, click on the 'Action' box for the CRN that is a duplicate course or course that causes a time conflict, select 'Web Drop', and click 'Submit'. You will notice that the 'Status' of the course changed from 'Registered' to 'Dropped'.
- In the 'Summary' box in the bottom right of your screen, go to the course with the status of 'Waitlisted', change 'Action' to **Web Registered** by selecting it from the drop down box, and click 'Submit'. You will notice that the status is now 'Registered'. You have successfully registered for the course!
